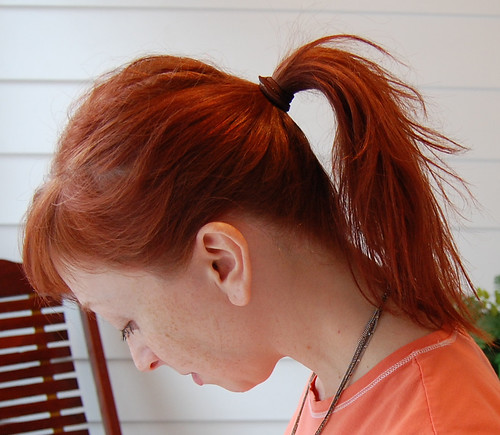
1. Start with a ponytail. I prefer an elastic that matches my hair color.
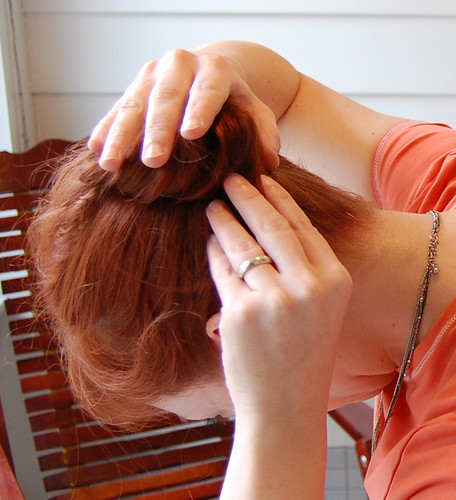
2. Tip your head forward until your ponytail is perpendicular to the ground. Fan the ponytail so that an equal amount of hair is spread in every direction. (I call this step the “hair fountain.”)

3. Cup the center of the “fountain” with one hand, and use the other hand to swirl the ends around the center. You can switch hands if necessary. I swirl clock-wise.

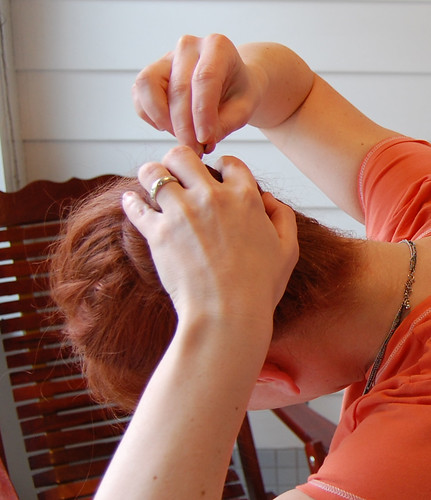
4. Continue swirling until the ends have tucked under the roll. The bun should be loose and barely contained within your hand.

5. Pin the edges to secure. (More on the pinning technique below.)
6. If desired, tease the roll for more volume.
The 90-second, bare-bones, no-makeup, no-narration video version:
Pinning Technique:
The pinning technique is key to maintaining your roll.
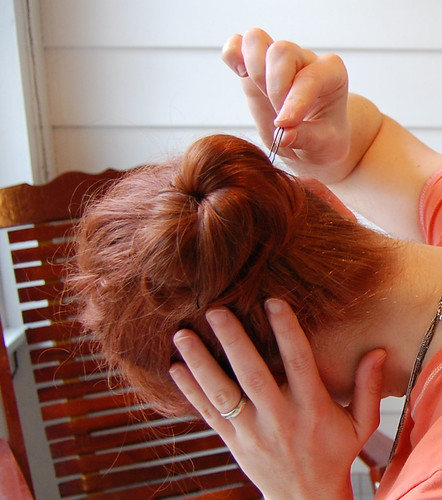
1. Position the pin perpendicular to your head, catching the roll with one half of the pin. The pin should penetrate the roll and the hair beneath, just touching your scalp.
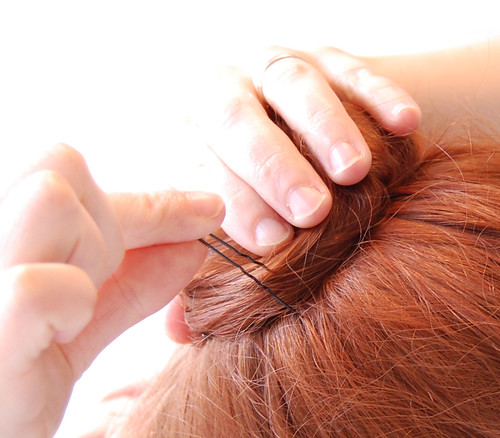
2. In place, rotate the pin so that the ends are pointing towards the roll. This twisting motion prevents the pin from slipping out. The tip of the pin (on the side away from the roll), should drag against your scalp. (But don’t hurt yourself!)
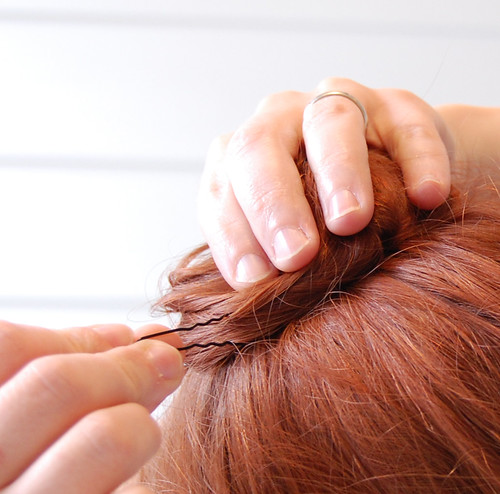
3. Slide the pin the rest of the way into the roll.
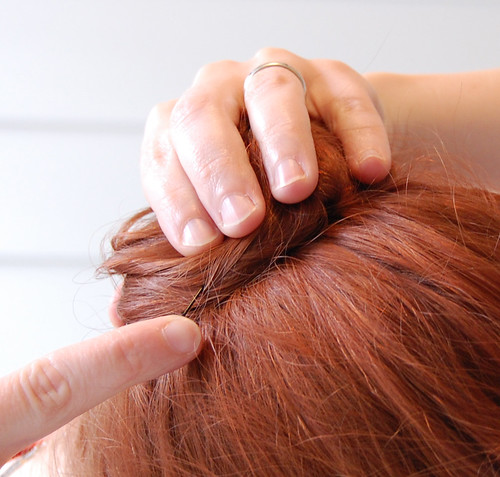
I’ve used hairpins in this example, but you can also use bobby pins. If using a bobby pin, spread the tips slightly before you start. Catch the roll with the longer tip, rotate, and insert.
Modifications:
Short hair. If you have shoulder-length or shorter hair, you can use a dounut shaped hair rat to create the volume you need to make this bun. Just slip the rat over your ponytail, before the "hair fountain" step.
Side bun. For the Big Messy Side Bun, start with a pony tail 3 – 4 inches behind one ear. You’ll need to leave space between the ear and the ponytail to accommodate the bun’s width…unless you’re going for a Princess Leia look. To make the “hair fountain,” you’ll be tipping your head to the opposite side, rather than nose to the ground.
Hi,
ReplyDeleteFirstly, I LOVE your blog and your beautiful outfits!!
And thank you for the tutorial, definitely doing the bun tomorrow.
:-)
Thank you :)
ReplyDeleteI love your blog!!!!
Thanks for this!! I've actually never encountered this method of bun-making, and it explains why yours are always so big and glorious while mine are puny little ping-pong-ball looking things.
ReplyDeleteNo big bun jokes? :) Thanks for the video. Nice buns. :)
ReplyDeleteGreat Blog!!!
ReplyDeleteI love it!!
Lisa
THANK YOU! I will now stop asking about it because I will be too busy trying to do this as easily as you do.
ReplyDeleteI have to say that I am shocked that you did not speak in the video. I totally expected a running commentary.
What is a donut shaped hair rat???
ReplyDeleteAwesome tutorial - and I too was expecting a running commentary! I was looking forward to hearing you.
ReplyDeleteIf my hair ever gets long again, I will try this out. Thanks!
OOOHHHH it's like you have solved one of the great mysteries of the universe for me!!!! I never knew it was so easy!!! Messy bun here I come :)
ReplyDeleteI have given you a special thankyou on my blog...I added a floral hair accessory. Let me know what you think.
ReplyDeletehttp://isthatnew.blogspot.com/
I'll speak in the next video. This was my first use of a video camera since highschool, and I was more worried about lighting and getting the bun right than speaking!
ReplyDeleteLondyn - google it, you'll see. It's basically a "filling" you use inside hairstyles to give your hair more volume. You can make your own by cutting the toes off of a sock and rolling the resulting tube into a doughnut shape.
Thanks for this post! I am hair-styling challenged and have been looking for something more professional than a ponytail now that I have no time in the morning (thanks to a 6 month old daughter :) -- I did this in about 2 minutes and love it. Can you do more posts for up-hair styles? :)
ReplyDeleteYou should have done this more, coz i always like your hairstyles, some days i thought you did better hairs than outfits.
ReplyDeleteThank you for info on how to do a messy bun...my buns (that just sounds funny) always tend to look too formal with every hair in place and it has the effect of making me look like a mean uptight librarian!
ReplyDeleteI only recently started reading your blog and I love it! I love to see others wearing bright colors but never have had the courage, but because of your blog I have ventured out into the world of COLOR! I also really loved the other hair how to on how to do a french twist...never could do till reading your blog!
I love the bun! My hair's a lot shorter than it used to be, but getting the perfect messy undone, but done bun is hard! Thanks!
ReplyDeleteCute! Thanks for the pics and the video. I plan to wear my hair like this, instead of just the boooring old ponytail! Thanks!
ReplyDeleteomg thank you so much for this... I never understood how other ladies made this messy-bun-thing seem so easy but I couldn't do it for the life of me. I'll try this soon!
ReplyDeleteGreat tutorial - love the cheeky eyebrow raise at the very end! :D
ReplyDeleteUsing Bunheads hairpins (for ballerinas or dancers) totally changed my life.
ReplyDeleteWell, they made wrangling my thick, straight, pain-in-the-arse Eurasian hair easier than ever before.
They're pretty cheap - about $6 for a dozen VERY strong pins.
Love,
SBJ at Fit For A Femme (www.fitforafemme.wordpress.com)
I did the bun just last Friday...
ReplyDeleteMy hair needed washing and I had no time... it was a my savior! Thank you !
great! did the bun today, it was so helpful. however, i'm looking for something more messy and unruly.
ReplyDeleteReally Gr8 ! Thanks For sharing..
ReplyDeleteJust tried this today with unwashed, nearly waist-length hair... SO MUCH VOLUME. In a funky way--I will try it tomorrow with more pins and see if it holds. Thanks for the tutorial!
ReplyDeleteThis is *great.* It's the only nice looking bun that will hold up for me.
ReplyDeleteThank you! I've had short hair for a very long time. I'm now growing it out and have completely lost my talent for creative easy styles. I tried your technique and it instantly looked great!
ReplyDeleteAlso, you are a gorgeous woman. Fabulous red hair!
I couldn't find any bobby pins, so I just pulled another ponytail holder over the entire bun and left it hanging there. It works just as well.
ReplyDeleteThanks for posting this. I too, am a runner and love my long hair but get tired of always putting it in a ponytail. I put the bun in in a few seconds- looks great!
ReplyDeletethx but what kinda clip did u put to hold it ?
ReplyDeleteI prefer the u-shaped hair pins, but bobby pins work, too.
ReplyDeleteYour site is really good and the posts are just wonderful. Thank you and keep doing your great work.
ReplyDeleteCan you use bobby pins ? x
ReplyDeleteAnon - you can use bobby pins, but I think the u-shaped hair pins work much better. They hold less tightly and allow you to loosen the bun for more volume.
ReplyDeleteFinally I can make a bun with my short, layered hair. I love this! Thank you soo much!!(:
ReplyDeleteHey guys, this works even better if you do it with a sock, I'll tell you what I mean: if you cut off the toe of a sock and roll it into a bun, then slip it over your ponytail, then make a "hair fountain" as she calls it, then just follow the rest of the directions...
ReplyDeleteTHANK YOU SO MUCH. It sounds silly, but I always looked at the buns that others make and thought, "What is this sorcery?" I've never been able to make a more voluminous, messy bun, but I succeeded for the first time today :) Also, thank you for ACTUALLY explaining how to pin a bun, because every hair video I have watched never truly explains it well.
ReplyDelete