Retro Reva
I've always hated the way my flash distorted my indoor photos. It erased wrinkles and made my eyes sparkle, but altered colors, “flattened” the image, created unwanted shine, and cast harsh shadows. However, without the flash, my pictures were too dark. I was stuck.
It wasn’t until I took a class for my digital SLR that I learned how to get good indoor outfit photos without a flash, but fancy equipment is not required. Most basic digital cameras have the capability to give you quality indoor photos, using ambient light.
Even a beginning photographer can implement these six, easy steps for better indoor pictures. For tips 3 – 5, you’ll probably need to have your camera on the P or Program setting.
1. Use a tripod. Due to the low light conditions inside a house or apartment, your camera will be using a slow shutter speed. Any movement of the camera (or subject!) will result in blurry photos. For best results, use a tripod to steady the camera. Tripods can be had for as little as $20. Resting the camera on a table or another solid surface can work, too.
2. Use the largest file size. If you start with the highest quality image, you are more likely to have a decent product once you’ve battled the low light and noise from a high ISO. Things might look a little blurry at the pixel level, but, if you’re using Flickr for your photo-hosting, the medium-sized photo will appear sharp on your blog.
3. Set your ISO at 800. This makes your camera more sensitive to light and better enables the device to take advantage of the light. This will introduce some "noise" into the picture, but it shouldn't matter much for blog use (especially if you are using a large file size).
 4. Adjust the exposure compensation. If you’re a camera novice, like me, you don’t want to mess with shutter speed and aperture. Instead, just use the exposure compensation button. In an indoor situation, you are most likely trying to brighten the picture. Find your exposure control (sometimes it’s buried deep in the menus, but other cameras have a quick access button on the body) and move it toward the positive end of the spectrum to lighten things up. The result is MUCH better than later adjusting the brightness and contrast in your photo editing software.
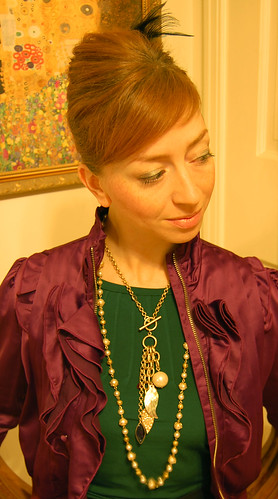 5. Set the white balance. Yellow light (from incandescent bulbs) can make you appear jaundiced (as in the photo to the right). It also distorts the colors of your outfit. Set your white balance to adjust for the appropriate light source. Your camera will have a few, pre-set white balance settings, such as day light, cloudy, shade, tungsten, and fluorescent. (Tungsten is the same setting as incandescent.) Choose the appropriate light source and your camera will adjust the color settings to compensate.
6. Boost your indoor light. Turn on every available light source. Turn on the lights in the next room and open the door. Open the blinds. Put the highest wattage bulb possible in your fixtures. Buy more lamps.
None of these techniques require you to know a thing about photography. As long as your camera has a Program mode, you can do some very basic manipulation of the settings to get great indoor photos. Your photos will be sharp, have a sense of depth and texture, and properly display the colors of your clothing.
Soon enough, though, warm temperatures and daylight will return to the Northern Hemisphere and we outfit bloggers can return to the great outdoors!
17 comments:
Thanks for this! I am done of the bloggers handicapped by darkness.
I meant I am ONE of them. Whoops.
THANKS SO MUCH !!! YOU MAY BE THE QUEEN OF EVERYTHING !!! YOUR GENEROSITY IS ONLY OUTWEIGHED BY YOUR STYLE!!! Have you considered running for President ? The first lady is stylish enough, but what you could do as Number One ! First, please outlaw daisy dukes ;)
So THAT's what all those little icons mean on my camera! Huh!
Seriously though, this was a great little tutorial, thank you for taking the time! I look forward to putting up some better quality snaps in the future.
birdonyourshirt.blogspot.com
thanks so much for these tips! i can't wait to try them!
Thanks so much for the tips! I have been having so much trouble with my outfit photos lately, these will be very helpful.
This was really great info! When I started increasing my exposure it made a big difference. Ironically, I also set it to the nightime setting (during the day) and it works well!
Ah! Tip #4 worked for me! I use the Auto setting on my camera (it does the white balance and speed automatically), and I've been tinkering with the brightness when I edit the pictures. But that +/- thingy rocks.
Thank you so much!
Great tips! thanks for sharing!
www.thejoyoffashion.blogspot.com
I seriously was just complaining about this same thing. I need to play around with my settings some. Great post!
This is a fantastic tutorial. I don't take indoor outfit photos too often, but when I do I always crank up the ISO and use ambient light.
That was so helpful! I'm actually doing an amateur photoshoot this weekend and these were some great tips. Thanks!
Great post. Thanks so much for the tips!
FANTASTIC tips. Thank you so much! (And thank you to the person who asked as well!)
Great tips - I had to add this even though others have said it before!!
Thank you so much for these tips!! I adjusted the +/- setting tonight for my inside shots and it made a huge difference. I haven't tried the rest of the tips yet, but just that one was already a huge improvement. Thanks for helping me get to know my camera a bit better!
I'm going to try these ideas...and soon.
Post a Comment